
With more than 48 hours* elapsed since we pulled our kayak out of Vermilion Lakes, we set off for our next kayaking adventure. The plan? Paddle around Lower Kananaskis Lake, for our longest paddle to-date. The reality? Plan B – kayaking Barrier Lake – on account of heavy rain and steady winds. The lesson? Always have a Plan B!!
* Canada’s Rocky Mountain National Parks require non-motorized watercraft users to clean, drain and dry their equipment and wait at least 48 hours before launching into another body of water. As of the date of writing, neither BC nor Alberta Parks has similar rules. Alberta Parks has an Aquatic Invasive Species advisory. We think it’s just simpler to follow the minimum 48-hour rule when planning all our kayaking adventures. And better environmental stewardship.


Getting There
Remember seeing photographs of vehicles parked all up and down Highway 40 during summer 2020? If so, you’ve seen pictures of the usually busy Barrier Lake Trail Parking Lot. Why so busy? There’s a decent beach, access to a couple of relatively easy hiking trails, and access to back-country campgrounds. Plus it’s the first parking lot of any size as you head south into K-country.
Given it’s usually very busy, we hadn’t planned on kayaking Barrier Lake. Plus, it’s almost always quite windy, which makes it a poor choice for beginner kayakers. But with only two other vehicles in the parking lot, the experience that comes from five previous kayaking adventures, and the need for a plan B, Mr GeoK suggest Barrier Lake. And I quickly agreed.

Set-Up and Launch
The boat launch is just past the pit toilets, on the left hand side of the road maybe 75 to 100 meters after you turn off Highway 40. It ends woefully short of the waterline. The water level in Barrier Lake has been kept deliberately low since the 2013 floods, so that there’s buffer capacity in the system in case of a massive rainfall event.
So we had a choice: carry our crate full of kit and our deflated kayak down to the shoreline for setup OR set up at the top of the boat ramp and carry the inflated kayak down to launch. We opted for the second approach, as the no parking zone at the top of the boat launch was pretty clean. AND it meant we didn’t have to schlep our crate with the pump, drying towels and other set-up/takedown gear back to the car when we were ready to launch.

It was a bit awkward to carry our inflated kayak down to the waterline. Between the end of the boat launch and the shore, there are driftwood logs and rocks of all sizes and shapes. On it’s own, it would have been a little challenging. But with the mandatory safety equipment and – more significantly – all our photography gear stowed aboard, there was some grunting and silent cursing involved! 😉
tl;dr?
If you’re already thinking this is too long, I don’t want to read, check out Mr GeoK’s 3 min Relive video recap for all the highlights.
Paddling CCW (again)
We launched into rolling waves, paddling against the wind. As with all our previous kayaking adventures, we stuck close to the shoreline, paddling counterclockwise. Mr GeoK is always the front paddler in our tandem kayak, so he got splashed a few times before we passed TransAlta’s run-of-river hydro plant.

Applying What We’ve Learned
We started kayaking this season, and we’ve had no lessons. We’ve learned as much as possible by reading and watching YouTube videos. REI’s website has resources for learning all kinds of outdoor activities, including kayaking. And we started with the lowest risk body of water within a short driving distance, working our way up from there.
Anyhow, the rolling waves, including whitecaps, had us practicing what we’d read/watched. As the rear paddler in the kayak, it’s my job to steer. So I worked to keep the bow pointed into the waves as we angled our way along the shoreline. At one point we talked about turning back. But then we decided it looked a little calmer over by that patch of sunshine, and carried on. 🙂

Shoreline Chat
It was a little calmer. Enough so that we could take turns paddling and trying some photography. I ended up with a water drop on my camera lens when shooting back the way we’d come.

Mr GeoK tried to photograph a pair of hawks that took off from the nearest shore. But between getting side tracked taking a wind reading (18 kph) and the rolling of the waves, it didn’t happened.
BUT, he did see a person wandering by the shoreline, seemingly in circles, as if looking for something.

We paddled closer and asked if he’s lost something. “My keys!” came the response. Then, “Just joking.” And then – to our astonishment – “Hey, D_____ and K___, is that you?”
Turned out it was the Hobie kayaker we’d met at Upper Kananaskis Lake a couple of weeks back!! We enjoyed a shoreline chat before continuing our paddle south.
Jewell Bay Backcountry Campground
We enjoyed lighter winds and a bit of sunshine as we passed Jewell Bay Backcountry Campground (one kayak camper in residence). Cloud remnants hung on the mountainsides.


Turnaround Point – Sooner Than Expected
The water grew increasingly murky. We expected to see dirty water – before we turned around on Highway 40 to go with Plan B, we’d seen Porcupine Creek flowing basically mud. So the south end of Barrier Lake was a thin mud slurry, with all sorts of forest floor debris floating on top.


With an inflatable kayak, we figure it’s essential to be able to spot submerged logs and other potential hazards, to minimize the risk of a catastrophic tear.
The other reason our turnaround point was sooner than expected? Because the lake is smaller than it used to be and our GPS map shows the size of the lake before the water level was lowered as a flood safety measure.

A Look at Barrier Day Use Area Construction
Paddling back, we got a nice boost from the wind/waves. We also got a good look at the construction underway at the Barrier Day Use Area, including extending the boat launch to the new, lower waterline. The little coffer dam reminded us of one of our favourite Sunday night shows: The Curse of Oak Island.


Return to Launch
Despite the rolling waves, I steered us a little further from the shore as we vigourously paddled back to our launch point. There were two reasons. First, to keep the stern roughly perpendicular to the waves. And second, because the waves were pushing us towards the shore and submerged tree stumps and an inflatable kayak are not a good combination.

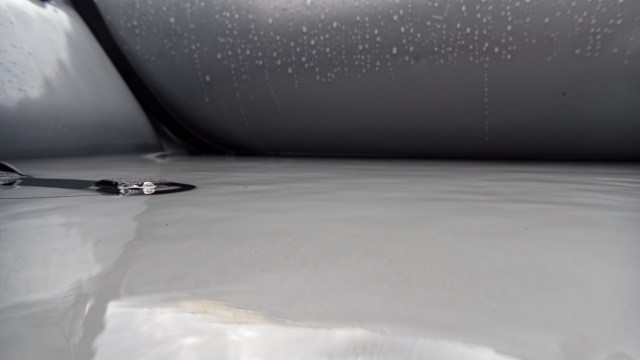
You can see from all the water droplets on Mr GeoK’s seatback and PDF that we got a fair bit of splash on this adventure.

Once ashore, we had to make our way back up to the boat launch and parking lot. This was harder than coming down. For one thing, gravity. For another, there was a cm or two of water in the bottom of the kayak. And third, we were pretty wet and a bit cold. After a couple of (unplanned) rest breaks, we made it!
Summary
Total paddling distance: 8.6 km
Total time: 2 hrs 15 minutes including 15 minutes for shoreline chat and photography
While Barrier Lake wasn’t on our list of 2021 kayaking locations, it worked well as a Plan B. But I certainly wouldn’t have wanted any less experience before taking to this usually windy, always cold lake in Kananaskis Country.
Pingback: Kayaking Lower Kananaskis Lake - Out & About with the GeoKs
Pingback: Happy?! - Out & About with the GeoKs